
Portuguese Experience
A Portuguese Tradition
Distillation of Aguardente using a 150 year old copper Alembic Still
Modern civilization has brought us many conveniences and in a world where time is money we are always trying to find a quick and easy solution to our problems and to meet our needs with the least amount of hassle. So in fact life is easier and more relaxed than it used to be. But is it really? Or have we lost a certain quality due to the pressures and stresses of our daily lives and quality in the things we consume, as they are all now either canned or bottled with added preservatives.
People are slowly realizing that the old fashion way of doing things is in fact much better and they are rediscovering traditions that were left behind which can bring us great pleasure.
The following is a narrative of one of these traditions – distilling pomace or brolho (the solid matter that is left over after the juice is removed from the grapes) to produce arguardente (grappa- wine brandy) with an alembic still that is at least 150 years old and a description of the techniques and equipment that was used by the older folk. You might say it is much easier just to go out and buy a bottle, but there is much more to the process than just obtaining the desired liquid, it is an experience that brings us pleasure, just like any other hobby. We also know that the final product is pure – just like baking a home-made cake or growing your own organic vegetables.
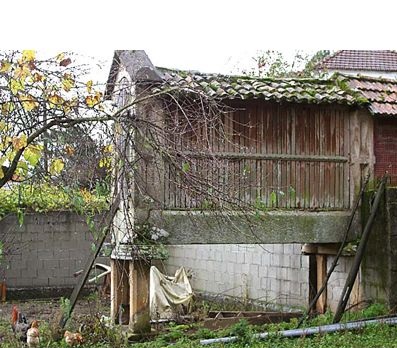
This distilling experience took place in a small village near Monção, a town located in the north-west of Portugal, close to the Spanish border.
The complete distilling process using a traditional Portuguese copper alembic took about 8 hours to complete (mind you – it was an enjoyable and relaxing experience) – this also included cleaning the pot for next year's distillation.
The day was beginning to break when we set off but you could tell it was going to be a beautiful autumn day as the sky was clear and the air crisp. Upon our arrival, we were greeted by Leandro's rooster (Portugal's national mascot), with his 'cock-a-doodle-do" and by Leandro himself, the kind old gentleman who was going to give us the distilling demonstration. We could tell that Leandro had been expecting us for some time now, so this meant we were late!
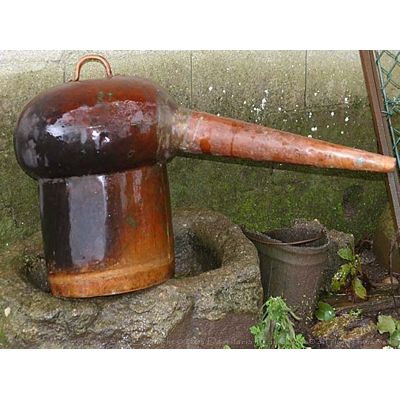
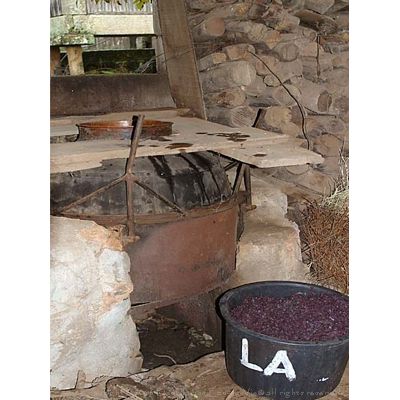
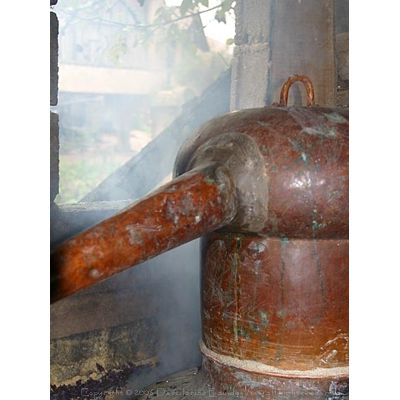
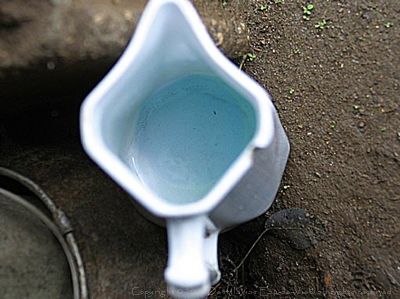
Leandro was anxious to start as there was much to be done until the end of the day. He led the way to the little hut where we were going to make the aguardente. The first thing we saw was the cask hood (the area where the vapours gather) of Leandro 's alembic still. It was quite odd looking. Leandro explained the reason for this was that it was 150 years old. The hoods of most alembics manufactured today have more of a curved, onion shape top – but they all basically function in the same manner.
Leandro told us, with certain detectable emotion in his voice, that this alembic still had belonged to his grandfather. During the Second World War, however, his father sold it to a neighbour as he was hard up for money and needed all the extra cash to get by during those difficult times.
Leandro's father, who was known as one of the best wine growers in the region, always spoke of the family alembic with grief. Leandro always felt a certain obligation to get the alembic back into his family's possession. Years later he did just that. He asked his neighbour how much he wanted for the copper alembic that his father had sold him: 'The yield of one distillation from Aires' (his father's surname) alembic". Leandro was very proud of his family's 150 litre copper alembic.
Commencing


Step 1

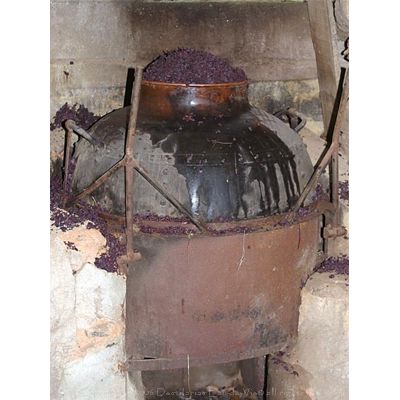
The 150 litre alembic still was in a little hut. The copper pot (the bottom part of the alembic) was positioned in a clay base area. This would help maintain the heat source so essential to the distilling process. The copper pot was also assembled with a metallic belt structure on the exterior, to help turn over the pot and clean it at the end of the distillation.
Step 2

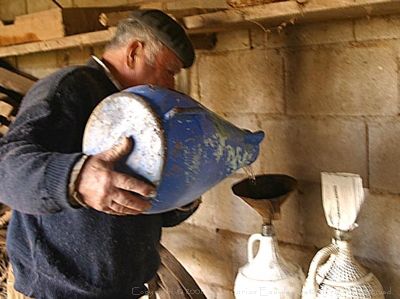
Close to the copper pot was a 20 litre glass jug. Leandro explained that it contained the remainder of last year's distillation. In other words it contained the so called heads and tails from the previous distillation – the sections that must be separated. The first 50 to 200ml (depending on the size of the still) of distillate that exits the condensing coil and the distillate at the end of the run which is referred to as the tails.
Nothing resembling a condensing recipient could be found near the alembic still. The condensing recipient is where the vapours, upon coming in contact with a cold surface turn back into a liquid form.
Step 3
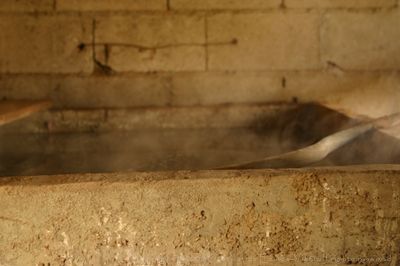
But in fact there was a large cement tank which held about 750 litres of water with the condensing coil inside. It was located right next to the copper pot. But why such a large recipient? Leandro explained that years ago there was usually only one person, who could afford to have a copper alembic in each village, so the owner of the alembic would distil arguardente for the entire community, or at least for those who had wine and then had the pomace. Leandro's grandfather happened to be one of the fortunate ones, and he needed a large condensing area of water as it would be a non-stop process for several days. Leandro explained that when it was time to make the aguardente his grandmother and father would work during the day while his grandfather rested and then he would work all night long. So it was a 24 hour non-stop process. It would take more than 26 days and nights of non-stop distilling to fulfil all of the community's requests. He added that even with such a large amount of water, this had to be changed on a regular basis as it would warm up.
Step 4
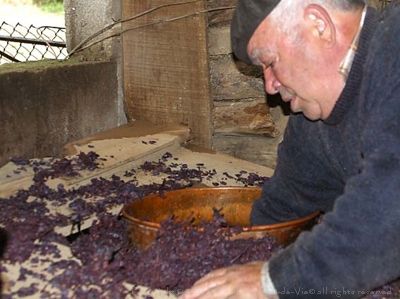
Leandro placed the large pails of pomace near the copper pot. Pomace, or brolho in Portuguese, is the solid matter that is left over after the grapes have been pressed in a mechanical press to remove all the juices. The brolho – the thin branches and grape skins- is left in the press until the moment when the distiller wishes to make the aguardente, where it is placed in the alembic.
Aguardente is usually only made during the cold winter months between November and February so the brolho is maintained tightly pressed in the mechanical press in order to preserve the alcohol essences found in the grape skins.
Step 5
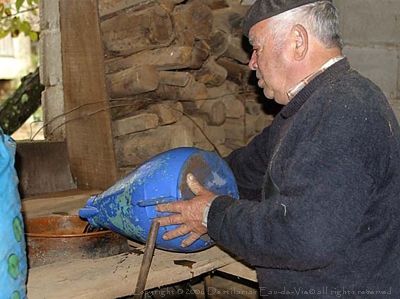
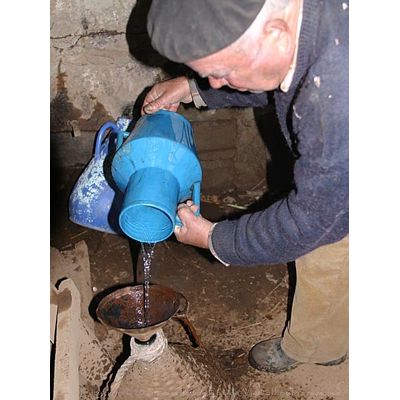
Leandro then started to fill the copper pot with plain water using a large blue plastic container. Leandro said he needed 6 to 7 jigas. What was a jiga you ask? It is a measuring unit that the old folk used to use and is equivalent to 10 litres. From our calculations this meant that 40% of the 150 litre alembic was filled with water. The final % alcohol at the end of the distilling process is dependant on the amount of water that is added at the beginning. The more water you place in the pot the lower the % of alcohol will be and vice-versa.
Step 6
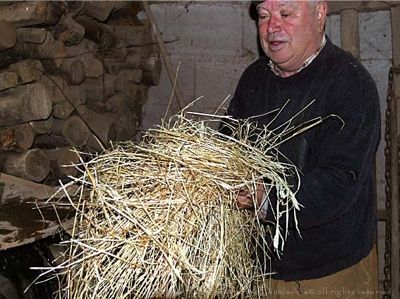
Leandro looked inside the pot to verify that the water level was just right. He then went to get a handful of rye straw and placed this inside the copper pot. He explained that the straw did not let the fire, or heat source directly beneath the pot come into direct contact with the product that was being distilled. Should this happen then the grape brandy – aguardente – would have a burnt flavour.
Step 7
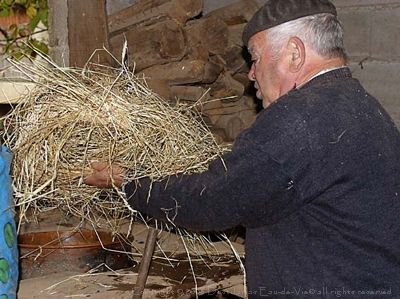
As many distillers can not easily get their hands on rye straw, there are copper sieve trays which substitute the straw. There are also many copper alembic models which come with a copper sieve tray placed at the bottom of the pot intended for this purpose. Leandro put straw into the pot where it was left floating on the water.
Step 8
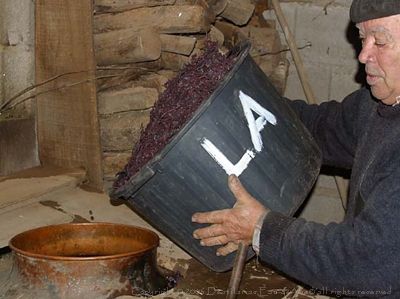
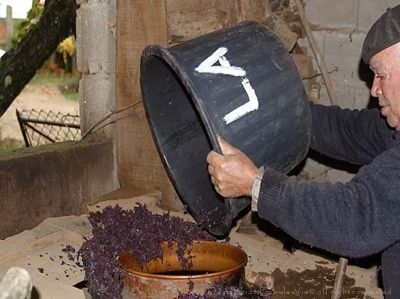
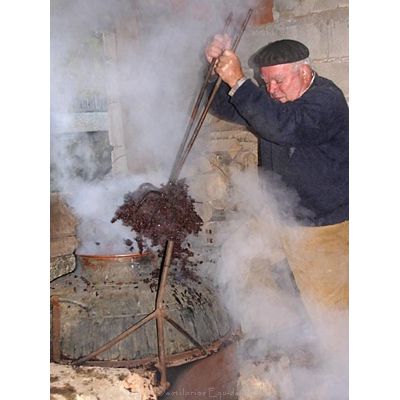
He then grabbed the large recipients with the grape skins and one by one he turned them over into the pot. When the copper pot was almost full to the rim he pressed the brolho into the sides of the copper pot to make room for some more. Leandro however did not press the centre core otherwise the vapours of the distilling process would not be able to pass through the brolho into the vapour chamber of the lid.

Step 10
When he was finished the copper pot was filled with brolho right to the top.
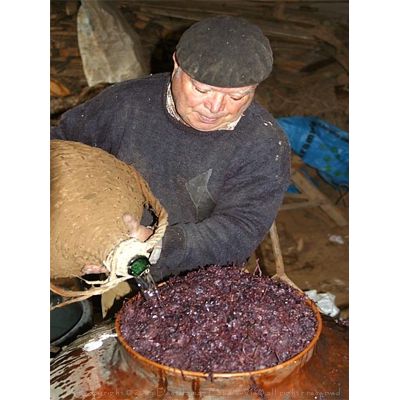
Step 11

Leandro then went to get the jug with last year's heads and tails and poured this evenly over the pomace before inserting the cask hood lid into the copper pot. Pouring the heads and tails over the pomance facilitates the chemical reaction between all the compounds. Leandro explained that if you did not have last year's heads and tails to add, this could be substituted by a very high grade of aguardente or another alcohol beverage which had no flavouring, such as vodka.

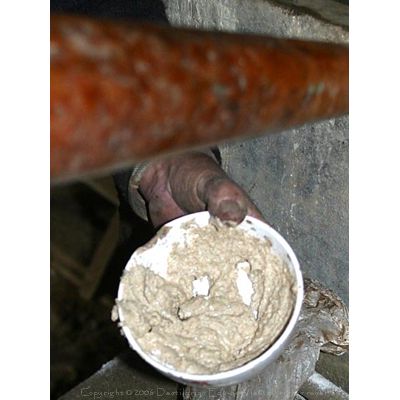
Step 13
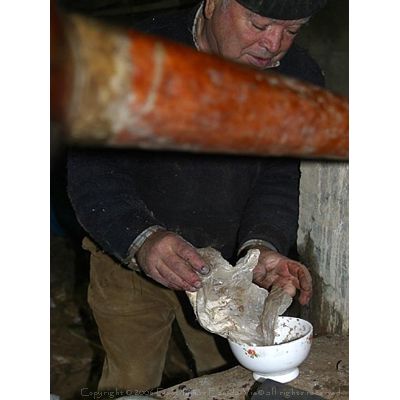
Leandro proceeded to make a putty-mixture made of rye flour and water. With this he sealed the connections, or seams between the cask hood lid and the bottom. Leandro explained that he was sealing the still so that no vapours would escape through the seams. A very simple, yet functional solution.
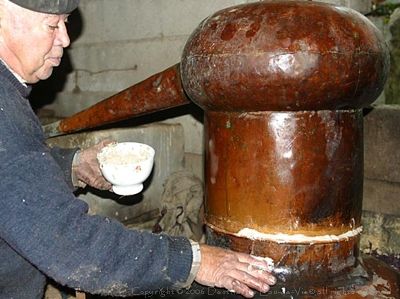
Step 15
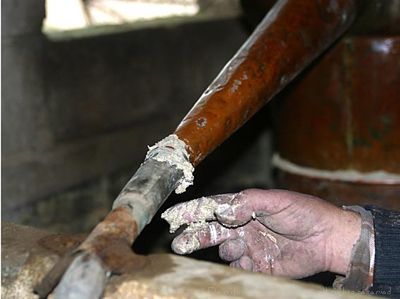
The connecting seams between the cask hood and the condensing coil were also sealed.
Step 16
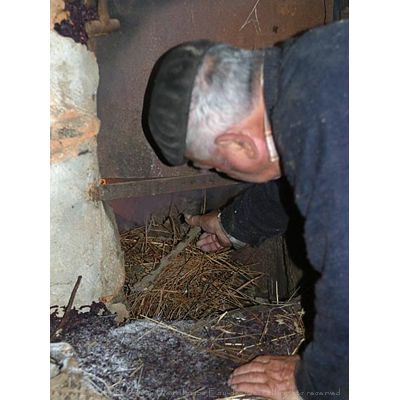
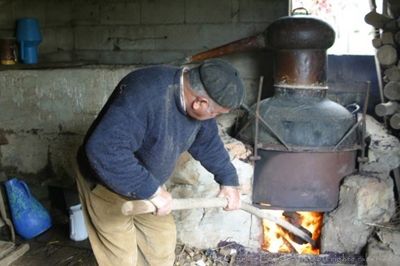
After everything had been sealed Leandro started the fire under the copper pot with pine needles. Once he had the fire going he added thick wood logs and these produced a very strong blaze.
Step 17
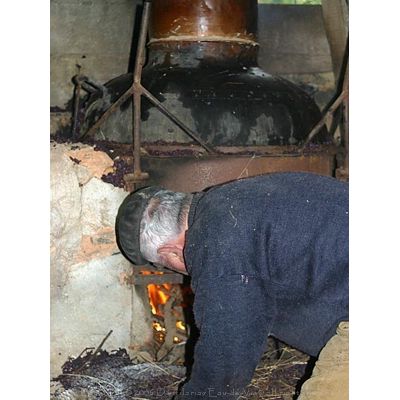
This would be the heat source to distil the brolho.
Step 18
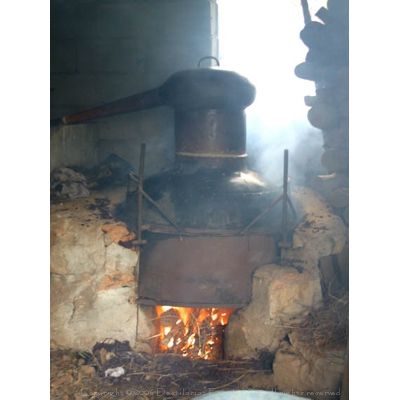
Well it was all in action. The fire from below started to heat the water which generated vapours that passed through the solid material. These vapours then rose to the top of the cask hood and searched for a way out – through the condensing coils.
The strong heat source was maintained for about an hour or an hour and a half. We could virtually see the rye-flour sealant dry up and become hard. It worked perfectly! No vapours escaped between the connecting parts.
Step 19
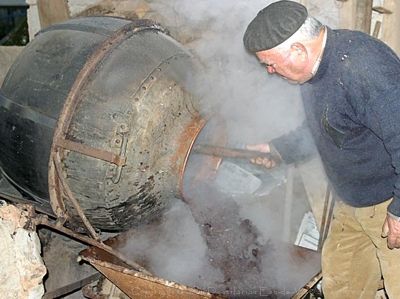
The strong heat source under the pot was maintained only during a certain period. Leandro went over to the water condensing recipient and placed his hand around the copper coil just above the water level. You could see from the rising vapours from the water pool that it was quite hot. He explained that it was here where he measured if the heat source under the pot was sufficient. When he could no longer touch the copper coil, he knew that he had to reduce the heat source.
Step 20

Leandro proceeded to spread out the hot coal under the pot with a long pole. Once the fire had died down a bit he placed a metal sheet in front of the entrance way to cut off the oxygen flow to the fire and thus maintain a subtle but constant heat source.
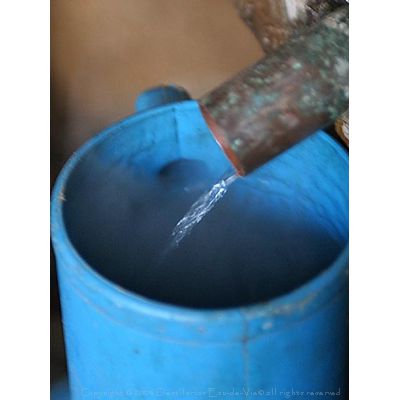
Step 21
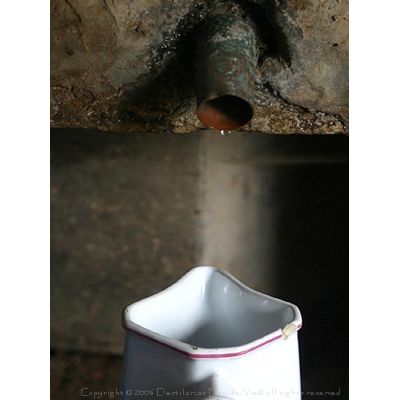
We began to obtain the first results – the first trickles of aguardente were coming out of the condensing pipe. This first section, of course, had to be separated as it was the heads and improper for consumption. Leandro showed us that in fact it had a bluish colour to it. The reason being that the first distillate cleaned out the impurities collected inside the condensing coil over the year (common in copper tubes).
Step 22
Leandro saved this and placed it in the glass jug for next year's distillation.
Before long the real thing was coming out, as could be seen by the clarity, pureness in colour (totally transparent) and the flow of the distillate.
Step 23

It is very characteristic to have a very fine line of distillate coming out of the condensing pipe – this is synonymous of a good quality aguardente - It is during this stage that you know whether your heat source is sufficient or too high. The higher the heat source, the greater the flow will be. The greater the flow, the less quality your aguardente will have.
Step 24

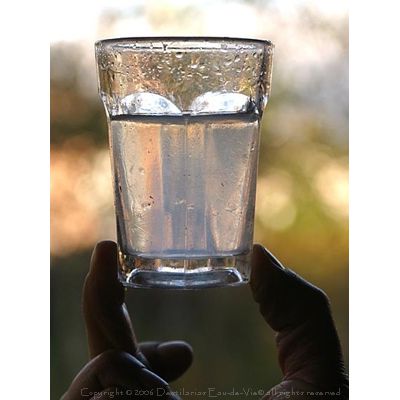
After obtaining a full jug of aguardente the alcoholic volume was measured with an alcoholmeter (Tessa scale, specially made for this wine region). It was 38%. Leandro stated that for his personal use it was sufficient but it could easily be raised higher with a re-distillation process – for this a smaller size alembic is used.
Step 25

Commercially sold aguardente has between 42% to 44% alcohol.
Step 26
In some regions of Portugal the aguardente is placed in oak casks to age and to acquire colouring. The oak will also influence the final flavour. In the Minho region of Portugal however, the aguardente is placed directly in glass jugs, acquiring no additional colouring.
Step 27
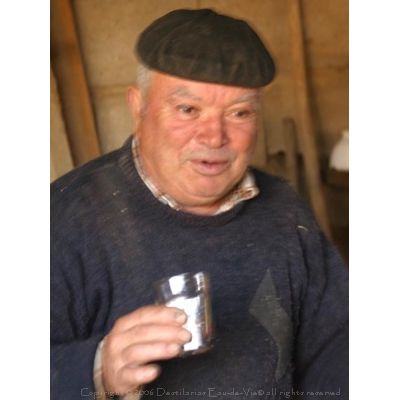
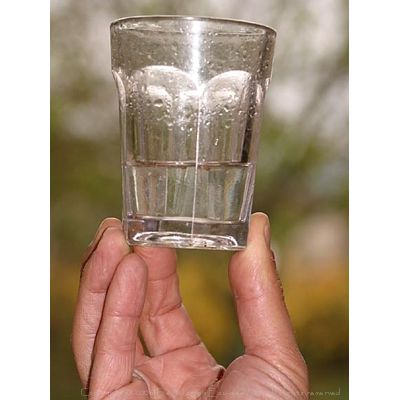
Leandro then took a glass and poured some aguardente to taste.
«À nossa saúde e que as nossas mulheres nunca fiquem viúvas» (to our health and may our wives never become widows) he toasted.
(Please excuse the blurry photograph but by now the photographer had also had a few shots himself!!!)
Step 28
After Leandro had obtained approximately 13 litres of good quality aguardente he kept a close watch on the distillate that was coming out of the condensing coil.
Step 29
When he saw that the colour of the aguardente was no longer transparent but had changed to a milky colour and that there was a stronger flow, he knew this was his cutting off point. He was now collecting the tails of the distillate. The tails are also improper for human consumption as they contain lower alcohols and can add an unpleasant taste to the aguardente.
Step 30
Leandro added the tails to the glass jug where he had placed the heads.
Now that we had made the aguardente (grape brandy), it was time for the laborious task of cleaning everything. This was an essential part of maintaining the copper pot in good condition and prolonging its longevity as it is the chemical acids that are produced during distillation that will corrode the copper walls of your alembic if this is not cleaned.
Step 31
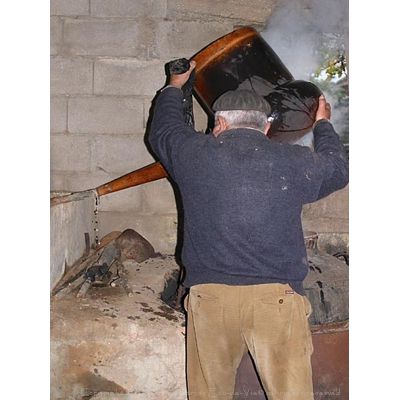
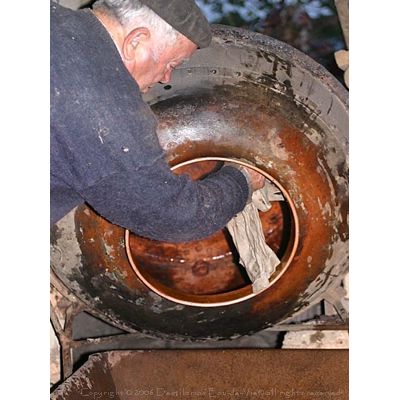
Leandro put out the fire beneath the pot and waited a while until the pot had cooled down. With a strong and direct blow upward to the cask hood he loosened the brolho from the pot. He took off the cask hood lid with the help of some cloths as it was still very hot. Then with the assistance of a scissor-type clamp he began to remove as much brolho from inside the pot as he could. With the aid of the soldered onto the outside of the pot and axeled to the brick structure, he tilted the pot to its side to empty it out. Careful, it's hot! – Leandro was also careful with the rising vapour as this contained alcohol!
Step 32
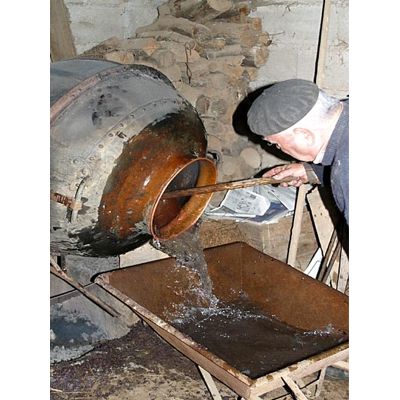
Leandro then turned the cask hood upside down, filled it with clean water and re-connected it to the copper coil tube. He made the clean water pass through the coil to clean out any substances that were left behind. This is an essential procedure because if the coil is not cleaned out with time it may become clogged.
Step 33
He then filled the pot with clean water to wash it out, and dried it with a cloth to absorb any excess water that was left behind.
Step 34
Once this was cleaned, Leandro then placed the pot on its upright position, covered it with a large burlap and placed a wide wood board on top. It was now tucked away for next year's distillation.
Step 35
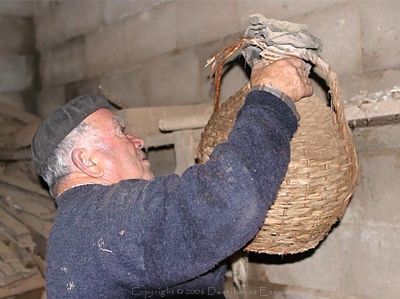
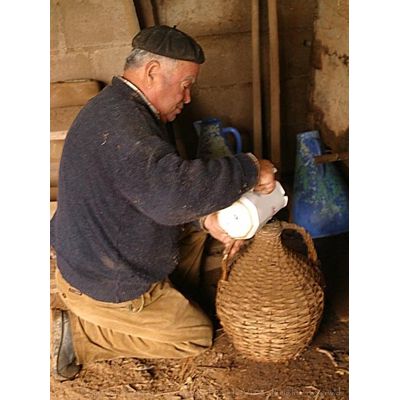
Leandro put his precious straw-covered glass jug safely away for the following year.
Finally with care he lifted the cask hood onto his shoulder and took this to his private wine cellar where the cask hood was placed on a shelf, as if it was a trophy to show off to all his guests.